A Love Story in Cool and Warm Tones: Creating the Look of Heated Rivalry
Cinematographer Jackson Parrell details the custom LUTs, LED-volume work and practical-driven lighting scheme that helped create the low-budget sports-romance series' distinctive visuals.
It was important to me that Heated Rivalry would look and feel elevated enough to punch above its weight, with respect to both the production's budget and viewers' expectations. The look of the show came from simple blocking; elegant camera movement; grounded, practical-driven lighting, and a strong use of saturation and contrast. We played to our strengths — using what we had and turning to virtual production when we needed to expand the series' world.

Building the Show LUT
I wanted the color in Heated Rivalry to look rich and feel intentional. I’ve always loved more contrast-heavy, saturated LUTs. My go-to LUT these days is one that’s pre-installed on the Arri Alexa 35 called Film Look D. I took an Alexa 35 and the Panavision T Series anamorphic lenses on a prep day to the Sleeman Centre in Guelph, Ontario, which is the arena where we shot all the hockey scenes. We had a couple of guys on skates, and we shot some simple shots that represented what we might do during principal photography.
Our colorist, Maxime Taimiot of Mels Montreal, cleaned up some of the skin tones and worked with the lighting in the arena, which, thankfully, was pretty modern LED lighting, and then we built a LUT representing what I wanted the arena to look like in the final image. That ended up being the show LUT; my DIT, Kyle Brunet, and I kept applying it to different scenes — a club scene, an exterior scene in which Kip enters Scott’s limousine in a back alley after an event — and it just hit the right notes. It was punchy and had a lot of saturation. It was also slightly underexposed, so it forced me to overlight a little bit, which typically led to a thicker neg — always a good thing.
Icy Cold to Summery Warmth — Using Color to Convey an Emotional Arc
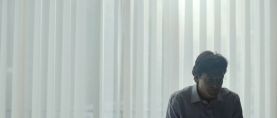
In the first scene of the series, Shane (Hudson Williams) and Ilya (Connor Storrie) meet outside the hockey arena in Regina, Saskatchewan, and they’re super cautious around each other. Regina is my hometown, and I felt bad because I had to make it look cold and dingy. Nothing about that scene feels sunny; it takes place entirely in the shadows, and they’re lit only by blue sky that we bounced a bit. We shot the whole series in the summer, so we had to make slight color adjustments that felt more chilly and signaled winter. We also didn’t want the images to give a sense of optimism just yet.
By contrast, I wanted there to be bottomless optimism to the final shot, because it needed to encapsulate what the show is about: These guys get to have this love story. It needed to feel like a celebration. It worked out in the script that the shot could take place at the end of the day, with the boys driving together at sunset. I was inspired by memories of being in the car as a kid and the feeling of light stroking through the window — that kind of stroboscopic effect. I wanted it to be incredibly warm and bring in that almost childhood level of contentment.
Capturing a Sunset on the Volume
The sunset shot was all done on the VR-wall stage. We looked through hundreds of options, trying to find an appropriate background plate. We couldn’t shoot our own, due to schedule and budgetary constraints, and we needed to find a plate that could last long enough to both carry the scene and the length of the credits, which was important to Jacob [Tierney, the show’s creator]. It also had to match the geography of where we were supposed to be, which was in cottage country in Quebec, Canada. We found a plate with the low sun coming through the trees on the left. We wanted to introduce more realistic lighting effects and aberrations into the image to make it look more like the real world; we worked to isolate the section of the background plate where the sun was strobing through the trees, and we paired that and pixel-mapped it to one of our Aputure Electro Storm XT26 LED lights that could strobe, matching the lights passing through the trees as we drove through it. As the vehicle moves through the tree-filled section of the road, the key light flashes as if it's the sun passing through the trees.


To light the shot as a whole, I started by determining how much light I could get off the volume itself. Then, we brought a secondary LED wall in on the non-key side and played the plate closer to bring more of that interactive lighting in. An array of Vortexes provided backlighting for the vehicle and the passengers, giving some separation from the wall, as well as sky and edge light. The primary key light — the Astera Storm — was pixel-mapped to basically wherever the sun was on the plate. An Arri SkyPanel S360-C provided some soft fill here and there, but most of it was played off the wall.
I worked on the concept of pixel-mapping to the driving plate shot with Loreen Ruddock, our head lighting technician, and our lighting-board operator, Claire Wall, was excellent. Claire really made the show for us and was part of the reason we were able to move so fast and play with so much color. We collaborated with the team at Dark Slope in Toronto to create the volume-wall assets via Unreal Engine; that really enabled us to add scope to the series, because we didn’t have access to locations like Las Vegas, the beach in Tampa, or Sochi, Russia.
I’ve found that one of the pitfalls of working with volumes is not having enough input on the Unreal Engine assets early on. On Heated Rivalry, I was adamant about working with the Unreal Engine team early in the design process, and during my prep period, I was lucky to have a lot of time to really develop everything to do with a scene — the textures, the lighting, the ambient occlusion. Kyle Brunet integrated his Pomfort Livegrade system into [Dark Slope’s] video processor so I could live-grade the wall as we were filming. That was the best decision we could have made. We were shooting massive page counts each day: Our Sochi ice-cream shop work, Tampa sunset scene, Vegas penthouse scene, driving interiors, Iyas brothers' apartment work, hotel interiors, and airport-terminal work was all shot on the VR wall. So, decisions about the wall and the set, colors and lights needed to happen really quickly. With our method, I could make quick adjustments involving less people.
Lighting and Shooting Episode 4's Club Scene
For the club scene in Episode 4, Jacob had a concept of what he wanted before we even saw the location. We planned a wraparound shot where Ilya realizes Shane is in the club, and then the moment between the boys on the dance floor, when they lock eyes and it’s slow-motion focusing on just the two of them, and then the way we would intercut with the sex scenes. It’s like you’re on a merry-go-round with them and then it just halts, and you’re with the two of them in that beat. We knew there would be a lot of Steadicam involved — James Poremba was our A-camera/Steadicam operator — and we wanted to have as much elegant, cinematic blocking as possible.


We used an actual club for the location, and there were so many lights in the ceiling! We had this incredible board op in Claire, but we didn’t have the time and budget to integrate our setup with the location’s lights, so we ended up bringing in the club’s own board operator to work with the existing lighting instead of bringing in anything of our own. I told myself I wouldn’t use magenta, pink and blue because it’s such a heavily used trope, but eventually, I asked the board op to show me that combo, and it was just so perfect. We committed to that and then used a strobing effect that was timed perfectly with the needle drop. We shot all the show’s club scenes in that same location — the bottom floor was Montreal, the top floor was Moscow, and a lot of the differentiation came from color choices. For Moscow, we used red, amber and other golden hues, giving it a more ornate feel.

Budget-Driven Practical Lighting
Our budget meant that I often couldn’t light locations the way I might on another project. There’s a scene where the guys are at an awards show, and they walk downstairs into a big, open space. For a room like that, I’d typically use a balloon light, but we couldn’t afford that. So, I decided if we couldn’t light from the sky, we’d have to light from the ground. We bought a bunch of these LED battery-powered table lamps you see at a cafe or restaurant. We needed lampshades that would work with our set design but could still provide enough soft return to light a face, and I ended up designing shades in CAD and then had them 3D-printed. We used them throughout the show. In the sex scenes with Scott and Kip in Episode 3, for instance, I took the same approach of designing and 3D-printing my own lampshades — in this case, the shades that hung in the bedroom.
"More Lamps!"
I’ve seen memes about the number of lamps that are in the series. I’d tell the production designer we needed many more lamps than he intended to dress the set in, and then I’d get to set and say, ‘Even more lamps!’

I was hooked on those little LED sources after I discovered I could put them anywhere and light faces with just practicals. Entire scenes were lit exclusively with table lamps, because it was an approach that allowed me to light super quickly. And, especially because there were so many two-handers in the series, I loved any opportunity to create small, intimate pools of light.
Filtration For a Filmic Look
To create a sense of halation around the source — be it our small LEDs or any on-camera light source — we always used a ¼ Tiffen Glimmerglass filter. The effect is somewhat reminiscent of film, and it takes the edge off the digital image. Also, nearly every scene was shot with a Lindsey Optics Brilliant-Pol Polarizer — even night scenes. If we needed to, we’d go up to 3,200 ISO so I could maintain a Polarizer in front of the lens. I think it’s a great way to shape light on faces when you’re moving really quickly; you can solve challenges that would take much longer with flags or diffusion. As you’re building the light wrap around a face, the Polarizer can also help you bring in extra contrast or extra color. I kept a sign on my monitors that said, “Spin your Pola!” because after spinning it, there would always be a moment where I thought, “This is the exact look I want.”

Unit stills by Sabrina Lantos. Images courtesy of HBO Max, Accent Aigu Entertainment and the filmmakers.